PreferenceActivity , PreferenceFragment and headers (Part 1)
In this tutorial we will build a preference screen in different ways.
Android provides a powerful xml driven framework to manage user preferences, that allows us to easily create preference screens such as those in Android itself and it automatically generates UI for that.
All we need to do is to simply use it in our app.
We will evaluate 4 scenarios:
Scenario 1: PreferenceActivity
In this scenario we will use a very simple but common example.

It's very important to note that these API are already deprecated and Google suggests if you’re developing for Android 3.0 (API level 11) and higher, to use a PreferenceFragment to display your list of Preference objects.
If you want to use ActionBarSherlock library is very simple to modify our code.
In previous scenario we describe how to implement PreferenceActivity calling deprecated
You can get code from GitHub:
Android provides a powerful xml driven framework to manage user preferences, that allows us to easily create preference screens such as those in Android itself and it automatically generates UI for that.
All we need to do is to simply use it in our app.
See these pages for more information on PreferenceActivity.and PreferenceFragment.
- Scenario 1: PreferenceActivity
- Scenario 2: PreferenceFragment
- Scenario 3: Preference Headers
- Scenario 4: PreferenceFragment and Headers with older versions
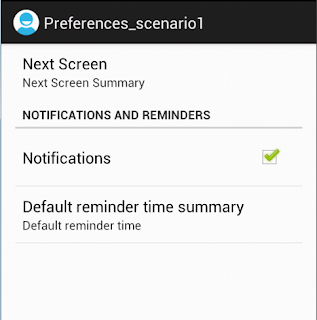
Scenario 1: PreferenceActivity
In this scenario we will use a very simple but common example.
- Define the preferences_scenario1.xml
The Preferences Activity screen is defined in the preferences_scenario1.xml file as shown below. This file is placed in the res\xml folder<!--xml version="1.0" encoding="utf-8"?--> <PreferenceScreen xmlns:android="http://schemas.android.com/apk/res/android" > <PreferenceScreen android:title="@string/pref_nextscreen" android:summary="@string/pref_nextscreen_summary"> <!-- You can place more preferences here that will be shown on the next screen. --> <CheckBoxPreference android:key="next_screen_checkbox_preference" android:title="@string/pref_title_next_screen_toggle_preference" android:summary="@string/pref_summary_next_screen_toggle_preference"> </CheckBoxPreference> </PreferenceScreen> <PreferenceCategory android:title="@string/pref_notification_setting" > <CheckBoxPreference android:defaultValue="false" android:key="pref_otificationskey" android:title="@string/pref_notifications" > </CheckBoxPreference> <ListPreference android:key="pref_SyncFrequencykey" android:entries="@array/syncFrequency" android:entryValues="@array/syncFrequencyValues" android:summary="@string/pref_syncFrequency_summary" android:title="@string/pref_syncFrequency" /> </PreferenceCategory> </PreferenceScreen> - Step 2: Create the Preference Activity
Prior to Android 3.0, the Preference Activity was used to host Preference Screens directly. For applications that target devices prior to Android 3.0, you may still need to usethe Preference Activity in this way. To create a new Preference Activity, extend the PreferenceActivity class as follows:public class PreferencesActivityScenario1 extends PreferenceActivity { @Override public void onCreate(Bundle savedInstanceState) { super.onCreate(savedInstanceState); addPreferencesFromResource(R.xml.preference_scenario1); } }You can inflate the Preference Screen directly by overriding theonCreatehandler and callingaddPreferencesFromResource, specifying the Preference Screen layout XML resource to display. Like all Activities, the Preference Activity must be included in the application manifest:
To display the application settings hosted in this Activity, open it by calling<activity android:name=".PreferencesActivityScenario1">/activity> startActivityorstartActivityForResult:Intent i = new Intent(this, PreferencesActivityScenario1.class); startActivityForResult(i, SHOW_PREFERENCES);


It's very important to note that these API are already deprecated and Google suggests if you’re developing for Android 3.0 (API level 11) and higher, to use a PreferenceFragment to display your list of Preference objects.
If you want to use ActionBarSherlock library is very simple to modify our code.
public class PreferencesActivityScenario1ABS extends SherlockPreferenceActivity {

 @Override
 public void onCreate(Bundle savedInstanceState) {
  super.onCreate(savedInstanceState);
  addPreferencesFromResource(R.xml.preference_scenario1);
 }
}
Scenario 2: PreferenceFragment In previous scenario we describe how to implement PreferenceActivity calling deprecated
addPreferencesFromResource() method. PreferenceActivity is the base class for an activity to show a hierarchy of preferences to the user. Prior to Android 3.0 this class only allowed the display of a single set of preference; this functionality should now be found in the new PreferenceFragment class.
- Step 1: Define the preferences_scenario1.xml
We can use same preferences_scenario1.xml file used before.This file is placed in the res\xml folder. - Step 2: Create the Preference Fragment
public class PrefsFragmentScenario2 extends PreferenceFragment {

        @Override
 public void onCreate(Bundle savedInstanceState) {
    super.onCreate(savedInstanceState);
     addPreferencesFromResource(R.xml.preference_scenario1);
 }
}
You can inflate the Preference Screen directly by overriding theonCreatehandler and callingaddPreferencesFromResource, specifying the Preference Screen layout XML resource to display. - Step 3: Modifify Activity
public class PreferencesActivityScenario2 extends PreferenceActivity {

 @Override
 public void onCreate(Bundle savedInstanceState) {
  super.onCreate(savedInstanceState);

  getFragmentManager().beginTransaction().replace(android.R.id.content,
                new PrefsFragmentScenario2()).commit();
 }
}
The PreferenceActivity class is used to host the Preference Fragment hierarchy. Like all Activities, the Preference Activity must be included in the application manifest.
It is very important to note that Preference Fragment is not supported on Android platforms prior to Android 3.0 (API level 11). As a result, if you want to create applications that support devices running on both pre- and post-Honeycomb devices, you need to implement this code.<activity android:name=".PreferencesActivityScenario2">/activity> public class PreferencesActivityScenario2 extends PreferenceActivity { @Override public void onCreate(Bundle savedInstanceState) { super.onCreate(savedInstanceState); if (Build.VERSION.SDK_INT < Build.VERSION_CODES.HONEYCOMB) { addPreferencesFromResource(R.xml.preference_scenario1); }else{ getFragmentManager().beginTransaction().replace(android.R.id.content, new PrefsFragmentScenario2()).commit(); } } }An alternative is to implement separate Preference Activities to support both, and launch the appropriate Activity at run time.Class c = Build.VERSION.SDK_INT < Build.VERSION_CODES.HONEYCOMB ? PreferencesActivityScenario1.class : PreferencesActivityScenario2.class; Intent i = new Intent(this, c); startActivityForResult(i, SHOW_PREFERENCES);
You can get code from GitHub:

Comments
Post a Comment